
Though life is beautifully crafted with lots of hurdles and troubles, we still manage to pass through each one of them like a boss. But some situations like bricked gadgets and devices can give you a tough time. Today we are going to discuss about the PXE-E61 PXE-M0F (Media Test Failure/Exiting PXE ROM) issue. In this post we will discuss about the various steps to bypass the error. Follow each step carefully to fix the issue.
Contents
A Proper glace at the error:

A black screen with white text will be displayed with the following lines of code:
“Realtek PCIe FE Family Controller Series v1.24 (date)
PXE-E61: Media test failure, check cable”“PXE-M0F: Exiting PXE ROM.
Reboot and Select proper Boot device or Insert Boot Media in selected Boot device and press a key”
Error Description:
This error showed up on my 2010 dell inspiron laptop as soon as I switched it on. The main reason behind it is that the device was unable to load OS from the hard drive of the laptop and it booted up the network controller chip interface instead. There could be endless workarounds for this particular error but we will discuss about the 3 main steps either of which will eventually fix the problem.
Method 1: BIOS Lookup
There could be a probability that some changes were made to your BIOS which manipulated the boot sequence. So lets change the priority of the boot devices on the laptop:
- Step 1: Power off your laptop and switch it on by pressing the power button. The moment it wakes up keep pressing the ESC key/F4 key (May vary device to device).
- Step 2: Now you are on your Basic Input Output System (Bios) configuration screen. Now jump to “Boot” section screen and there you will find boot priority sequence. In 1st Boot select Hard Disk and save the settings.
- Step 3: Reboot the laptop and see if you can boot into the Operating System of yours.
Method 2: Resetting BIOS
If changing the boot sequence of the laptop doesn’t bypass the error, then we will simply restore the changes made to the BIOS (If Any). Reverting back to the original boot sequence settings of the BIOS have fixed lots of issues in my past experiences. So to reset the settings:
- Step 1: Reboot into the BIOS again, by pressing the ESC/F4 key.
- Step 2: Then snap to the “Exit” section using the arrow keys on your keyboard and press “Enter”.
- Step 3: Select “Load Setup Defaults” option and hit “Yes” to save it. It will revert back to the default configuration of the laptop.
Now reboot your laptop and see if it bypasses the error screen or not.
Method 3: Let’s Do The Hardware
If you scrolled down to this very part of the article then probably the BIOS method didn’t worked for you. Don’t worry, it means that there might be a problem with the hardware itself. It could be a complete malfunction of your hard disk or a simple connection problem. Opening up the laptop looks messy and need proper level of attention. But believe me getting to hard disk of your laptop is not that difficult. If the above two methods didn’t work for you then this definitely will work. Sometimes with the old models of laptops, the hard disk slips outside the connector jack of the motherboard due to some jerk or improper handling. We have to make sure that ithas been connected properly or not; if not we will connect it and complete the connection. So lets get into it:
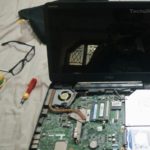
- Step 1: Get appropriate tools for opening up the laptop, We have previously discussed using the Jackly 32 in 1 magnetic screw driver in this article Fix laptop’s fan noise.
- Step 2: Unscrew all the bottom screws which is holding the components from below. Note that I am opening up my dell Inspiron 2010 Laptop, if you have a different laptop then the disassembly may vary. (You can find the disassembly video of your laptop model on YouTube.)
- Step 3: After Unscrewing all the screws present below the laptop, then turn over and firmly remove the keyboard by sliding a business card. Make sure not to hurt the other components while removing it, soon the keyboard pulls off. Slide your hand to firmly remove the connection cable strip of the keyboard.
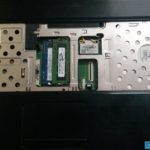
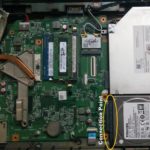
- Step 4: Now when the keyboard is off, unscrew the 3 screws to remove the metallic plate to get to the hard drive. Also make sure you have removed the power cable and track pad flat cable.
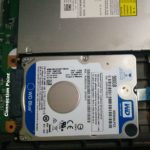
- Step 5: If things went as said you will find the hard drive is not properly connected to the motherboard this long. Due to which the PXE-E61 (cable not connected) error was showing up. Just simply slide the hard drive towards the motherboard’s jack and make the connection complete.
That’s it!! If still the error screen is showing up after the the reboot then check your hard drive if its working properly by connecting it to any other laptop.
Any Suggestions? or have something to share with us, hassle free comment it down below. We take our feedbacks very seriously. The reply will show up on the page ASAP.