
Transferring data when you buy a new system sometimes becomes very hard.
But how transfer data between 2 computers?
There are several solutions out there on different websites these are some of the best options.
In this article, you will find three very simple solutions to transfer data to a new Windows 10 PC.
Contents
How Transfer data to a new Windows 10 PC?
Using OneDrive
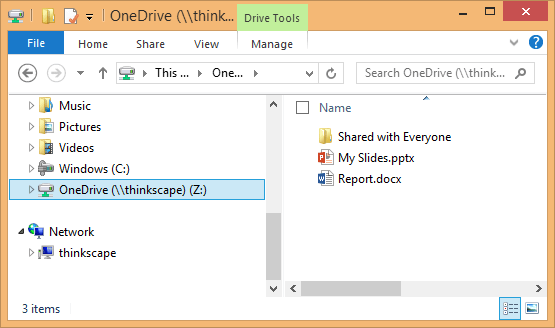
OneDrive is Windows 10’s file hosting service. It works with a Microsoft account and allows you to upload files. The idea here is to use it to transfer your files through Microsoft Cloud.
OneDrive is available for Windows 7 and 8.
- For Windows 7, download it from this link.
- For Windows 8 and 10, use Windows Store to install it, if it isn’t already.
Prepare files for transfer to OneDrive

On the old PC, we configure OneDrive to synchronize files online in order to recover them on the new PC. You must use the same Microsoft account on both PCs.
- Open OneDrive from the icon at the bottom right next to the clock or by doing a Cortana search.
- Skip the welcome steps.
- OneDrive will then automatically upload your user profile files (Documents, video, images, etc.)
- To control, click on the OneDrive icon at the bottom right of the screen> More> Settings
- Then go to tab Account > Choose your folders.
- The list of folders to synchronize is displayed.
Well done! everything is ready to transfer data from the old PC to the new PC in Windows 10.
Recover files on new PC with OneDrive
Finally, on the new PC, we configure OneDrive to synchronize the files and recover them.
- Log in with the same Microsoft account as the old PC
- Then open OneDrive. If it is not present, install it from Windows Store.
- Once installed synchronization is automatic and you recover the files.
Well done! you have successfully transferred its data to a new Windows 10 PC.
Via a network share
The other solution is to transfer files over the network.
To do this, we share the user folder of the old PC and access it from the new one.
Finally, we copy the files and data from the new PC.
Create a network share
- Open the file explorer.
- Click Disc C >> User folder
- On the username containing the data, right-click and then grant access to the > specific people.
- Leave your default username.
- Then click on Share.
- The user folder is shared.
- On this page to modify the parameters of the elements, click on “do not modify the parameters”.
Well done! network sharing is ready to transfer data from the old PC to the new PC in Windows 10.
Transfer data over the network
Then on the new PC, we access the network share in order to copy the data.
- Open the file explorer
- Then unroll the network. If you have an alert to enable network discovery, do so.
- Computers are displayed, open the old PC
- Enter the login information, i.e. the user account and password present on the old PC.
- You then access the list of shares, there is the user folder.
- There are different user folders with the data.
- Select the folders to transfer, you can leave press the CTRL key and click successively on the files to copy.
- Once the files have been selected, right-click then copy.
- Finally, open the disc C> User> your username.
- Right-click and paste.
- The files are copied and transferred then.
Well done! you have successfully transferred its data to a new PC via the Windows network.
With an external USB hard drive or USB stick

Here it is a question of using an external hard drive or USB key as a medium to transfer your data.
- You have to copy the files to the external hard drive.
- Then plug it into the new PC.
- Finally, we copy the files from the external hard drive to the new PC.
- From the old PC, insert the USB key or connect the external hard drive.
- With the file explorer: Open the C> User disc and your user name.
- Select the folders to transfer, you can leave press the CTRL key and click successively on the files to copy.
- Once the files have been selected, right-click then copy.
- Then open the reader of the USB key or external hard drive.
- Right-click and paste.
- The data to be transferred is now on the medium.
- Disconnect the latter.
- Then plug it into the new PC.
- Then open the player.
- Select all the folders then right-click and copy.
- Finally, open the user folder: Open the C> User disk and your user name.
- Right-click paste to copy and transfer the data.
Well done! you have successfully transferred its data to a new PC via USB stick or external hard drive.
Using PCMover (Paid – Demo Version Available)

Laplink PCmover Home is a quick and easy way to transfer from one PC to another.
This powerful application transfers all your selected programs, files, and settings from the logged-in user of the old PC to the logged-in user of the new PC.
PCmover Home can transfer your PC via a network, a Laplink USB cable or Laplink Ethernet cable.
Please note this is a paid application available in several versions:
- PCmover Express moves your user data for € 23.95.
- PCmover Home moves your user data AND applications for € 31.95.
- Finally, the Pro edition is € 47.95.
The PCMover site page
To transfer your data from an old PC to a new PC with PCMover.
- Download and install PCMover on both PCs
- Enter and validate the serial number of your license in order to activate it
- Then connect the two PCs, either by direct network or USB cable or via your LAN network (by Wifi or Ethernet cable).
- If all is well, the old PC will appear with the new PC.
- Click on the new PC then choose the transfer mode. If you want to transfer all the data with the applications or select a part.
- Then the type of transfer, automatic or choose the elements to transfer.
- Below, we choose the data to transfer (Music, Images, Videos, Documents, other files, and applications).
- The application icons appear.
- Then the data transfer takes place and if all goes well, it ends.
- Then check on the new PC that you are recovering all the data.
Well done! you have successfully transferred its data to a new PC with PCMover.
I hope this article was helpful, which method you prefer to let us know in the comment section down below.