
Its been not that long, since Google chrome started showing visitors a “not secure” warning. Websites using just HTTP started getting flagged as insecure on the left top corner of the Address bar. In theory, most of the blogs and news websites doesn’t require SSL or a secure connection over the HTTP protocol. Reason behind they don’t ask for passwords, credit/debit card details or other sensitive information from their readers. But for the vast majority of the websites on the other hand like e-commerce, e-banking or those who deals with personal details requires a SSL certificate.
Contents
What is SSL? or why do you need one?
SSL (Secure Socket Layer) encrypts the connection between the web browser and web server. It converts the sensitive data (from a Form/login page) into an unreadable format. Making the connection between the server and the client browser secure from hackers/eavesdroppers. But why you exactly need one?
Of course you don’t wanna make your traffic vulnerable. Adding to that, Google love those sites with the green padlock sign. Yeah, we have witnessed a slight increase in SEO on sites with SSL compared to those without having one. So lets list the advantages (Pros) and disadvantages (Cons) of using HTTPS on your website.
Advantages/Pros
Privacy:
As we have discussed above, SSL binds a cryptographic key digitally to the details which is entered by the user. Making it impossible for automated sniffing tools or bots to intercept what comes between the user and the web server. So it completely kills the headache of compromising your visitor’s sensitive data.
Faith:
The effort invested on your website in designing its interface becomes worthless if your traffic leaves immediately. The green padlock gives a sense of security & reputation to the users. So the more confident your traffic will be the great your website will perform.
SEO:
The online space is becoming more and more advanced. First Google brought the concept of mobile friendly pages, ranking those responsive sites higher. Now its time for security, where websites with SSL is tend to ranked higher than those without having one. The more friendly your site will be with Google the great you will cut through competition.
Disadvantages/ Cons
Latency:
The SSL (HTTPS) takes more round trips compared to the hypertext transfer protocol (HTTP). Theoretically it could create performance compromises, but in practicality its negligible and doesn’t occur much.
Resource hungry:
Again in theory, https takes more of your server resources compared to those site without having https. But if you have correctly set up SSL on your website then its not a problem. Note that, if your blog’s traffic is too high (over 10k real time) then it could be a little point of concern.
Price:
The real con of having https is that you have to purchase one. Every hosting companies provides SSL certificate but the added cost is quite high to own one. Organizations like Let’s Encrypt provides free SSL for your website and its easy to setup. But in this article we will be setting up our free certificate using the CloudFlare flexible SSL.
So lets close the discussion and buckle up for making our address bar green. So lets start:
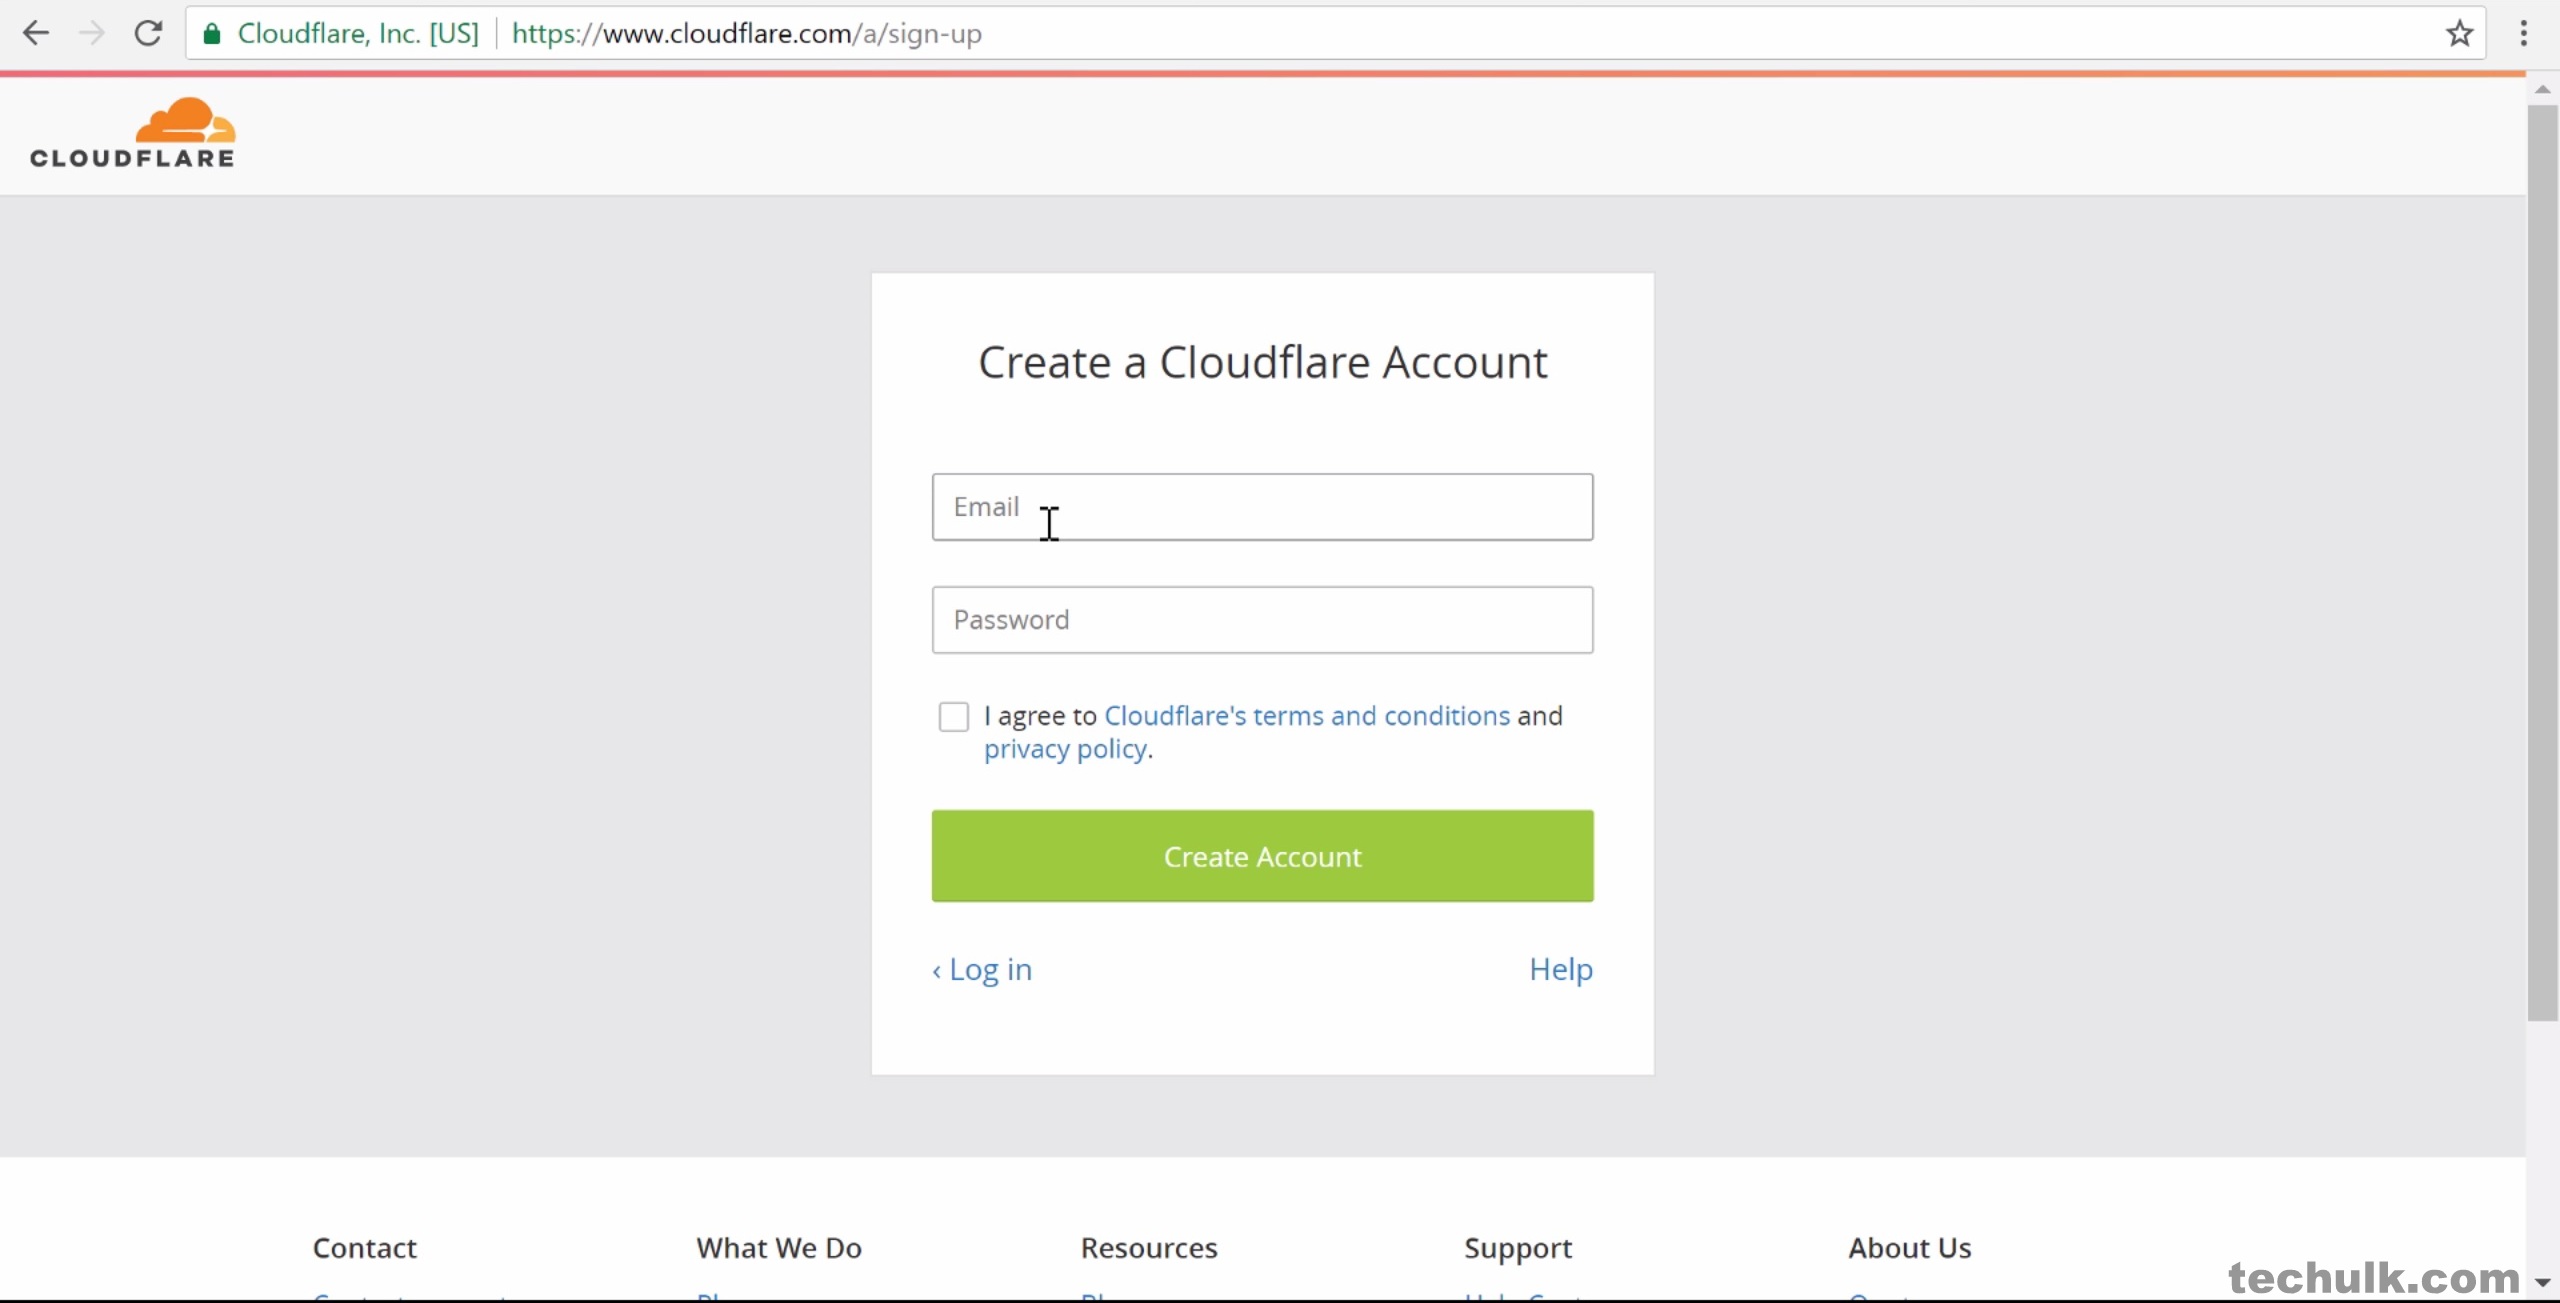
Step 1: First of all head to the sign up page of our one and only CloudFlare. [Click Here]
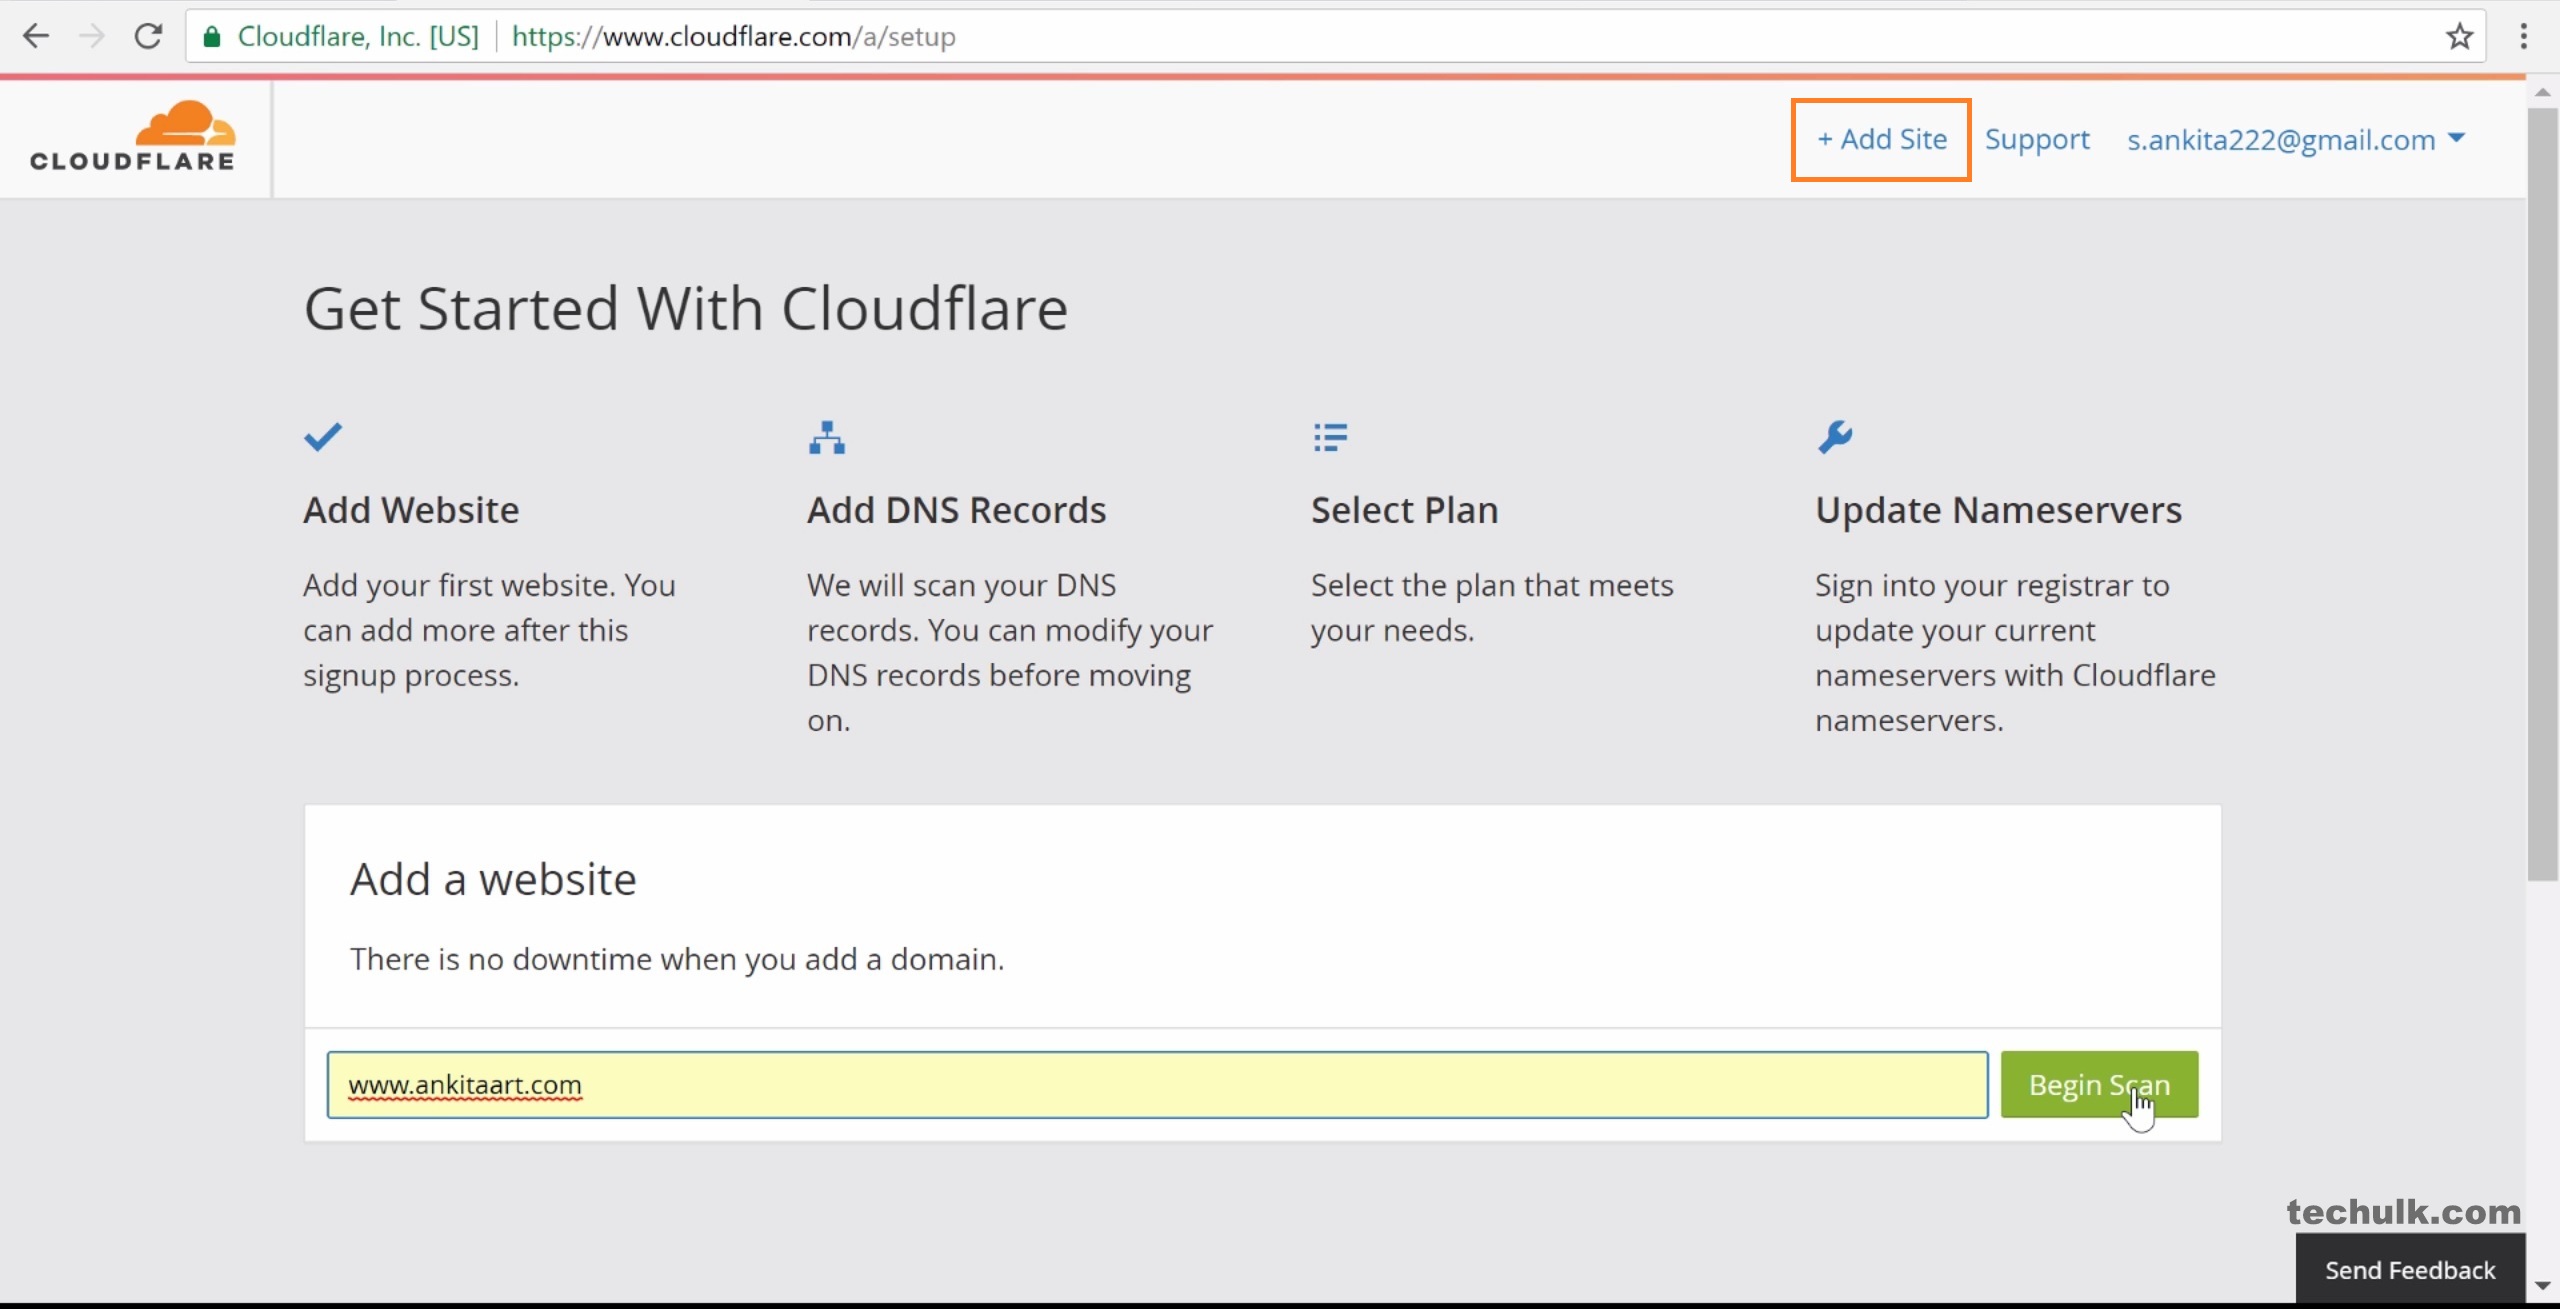
Step 2: After signing up, login to your CloudFlare account and enter your domain name under “Add a website” box. After that hit “Begin Scan” to continue.
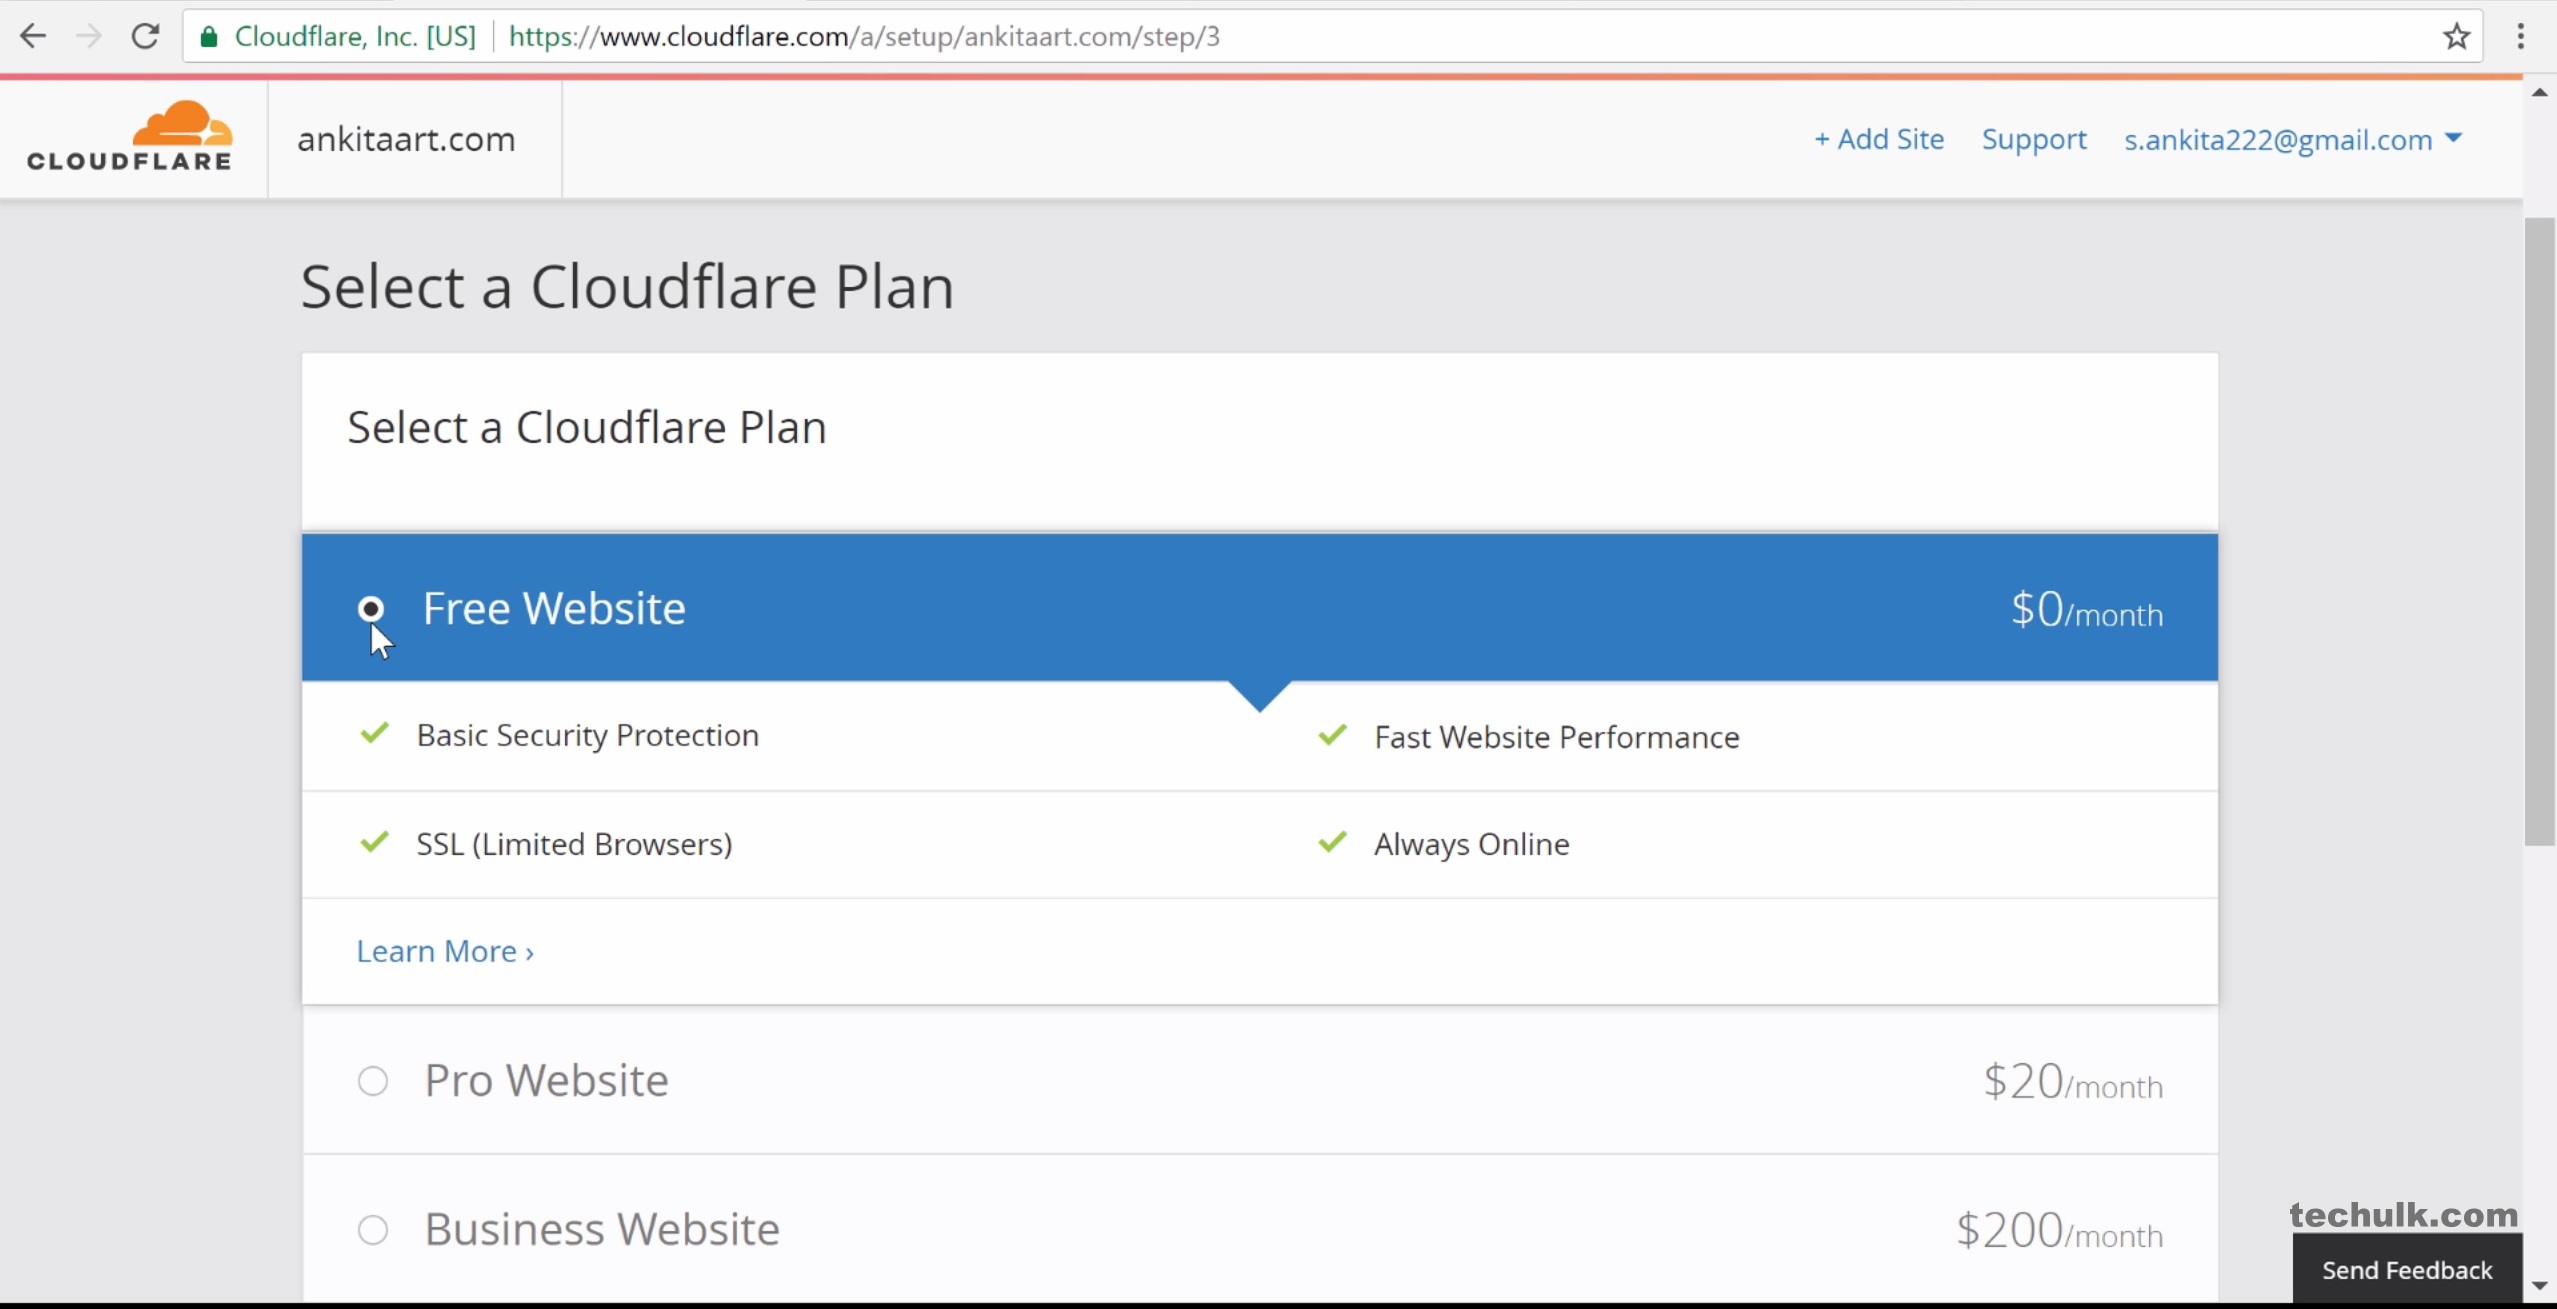
Step 3: The scan will take around 10 minutes and the next page with suggestions will be listed on the screen. Scroll down and click the green “Continue” option. Then you have to select a “CloudFlare Plan”, choose “Free Website” and hit continue.
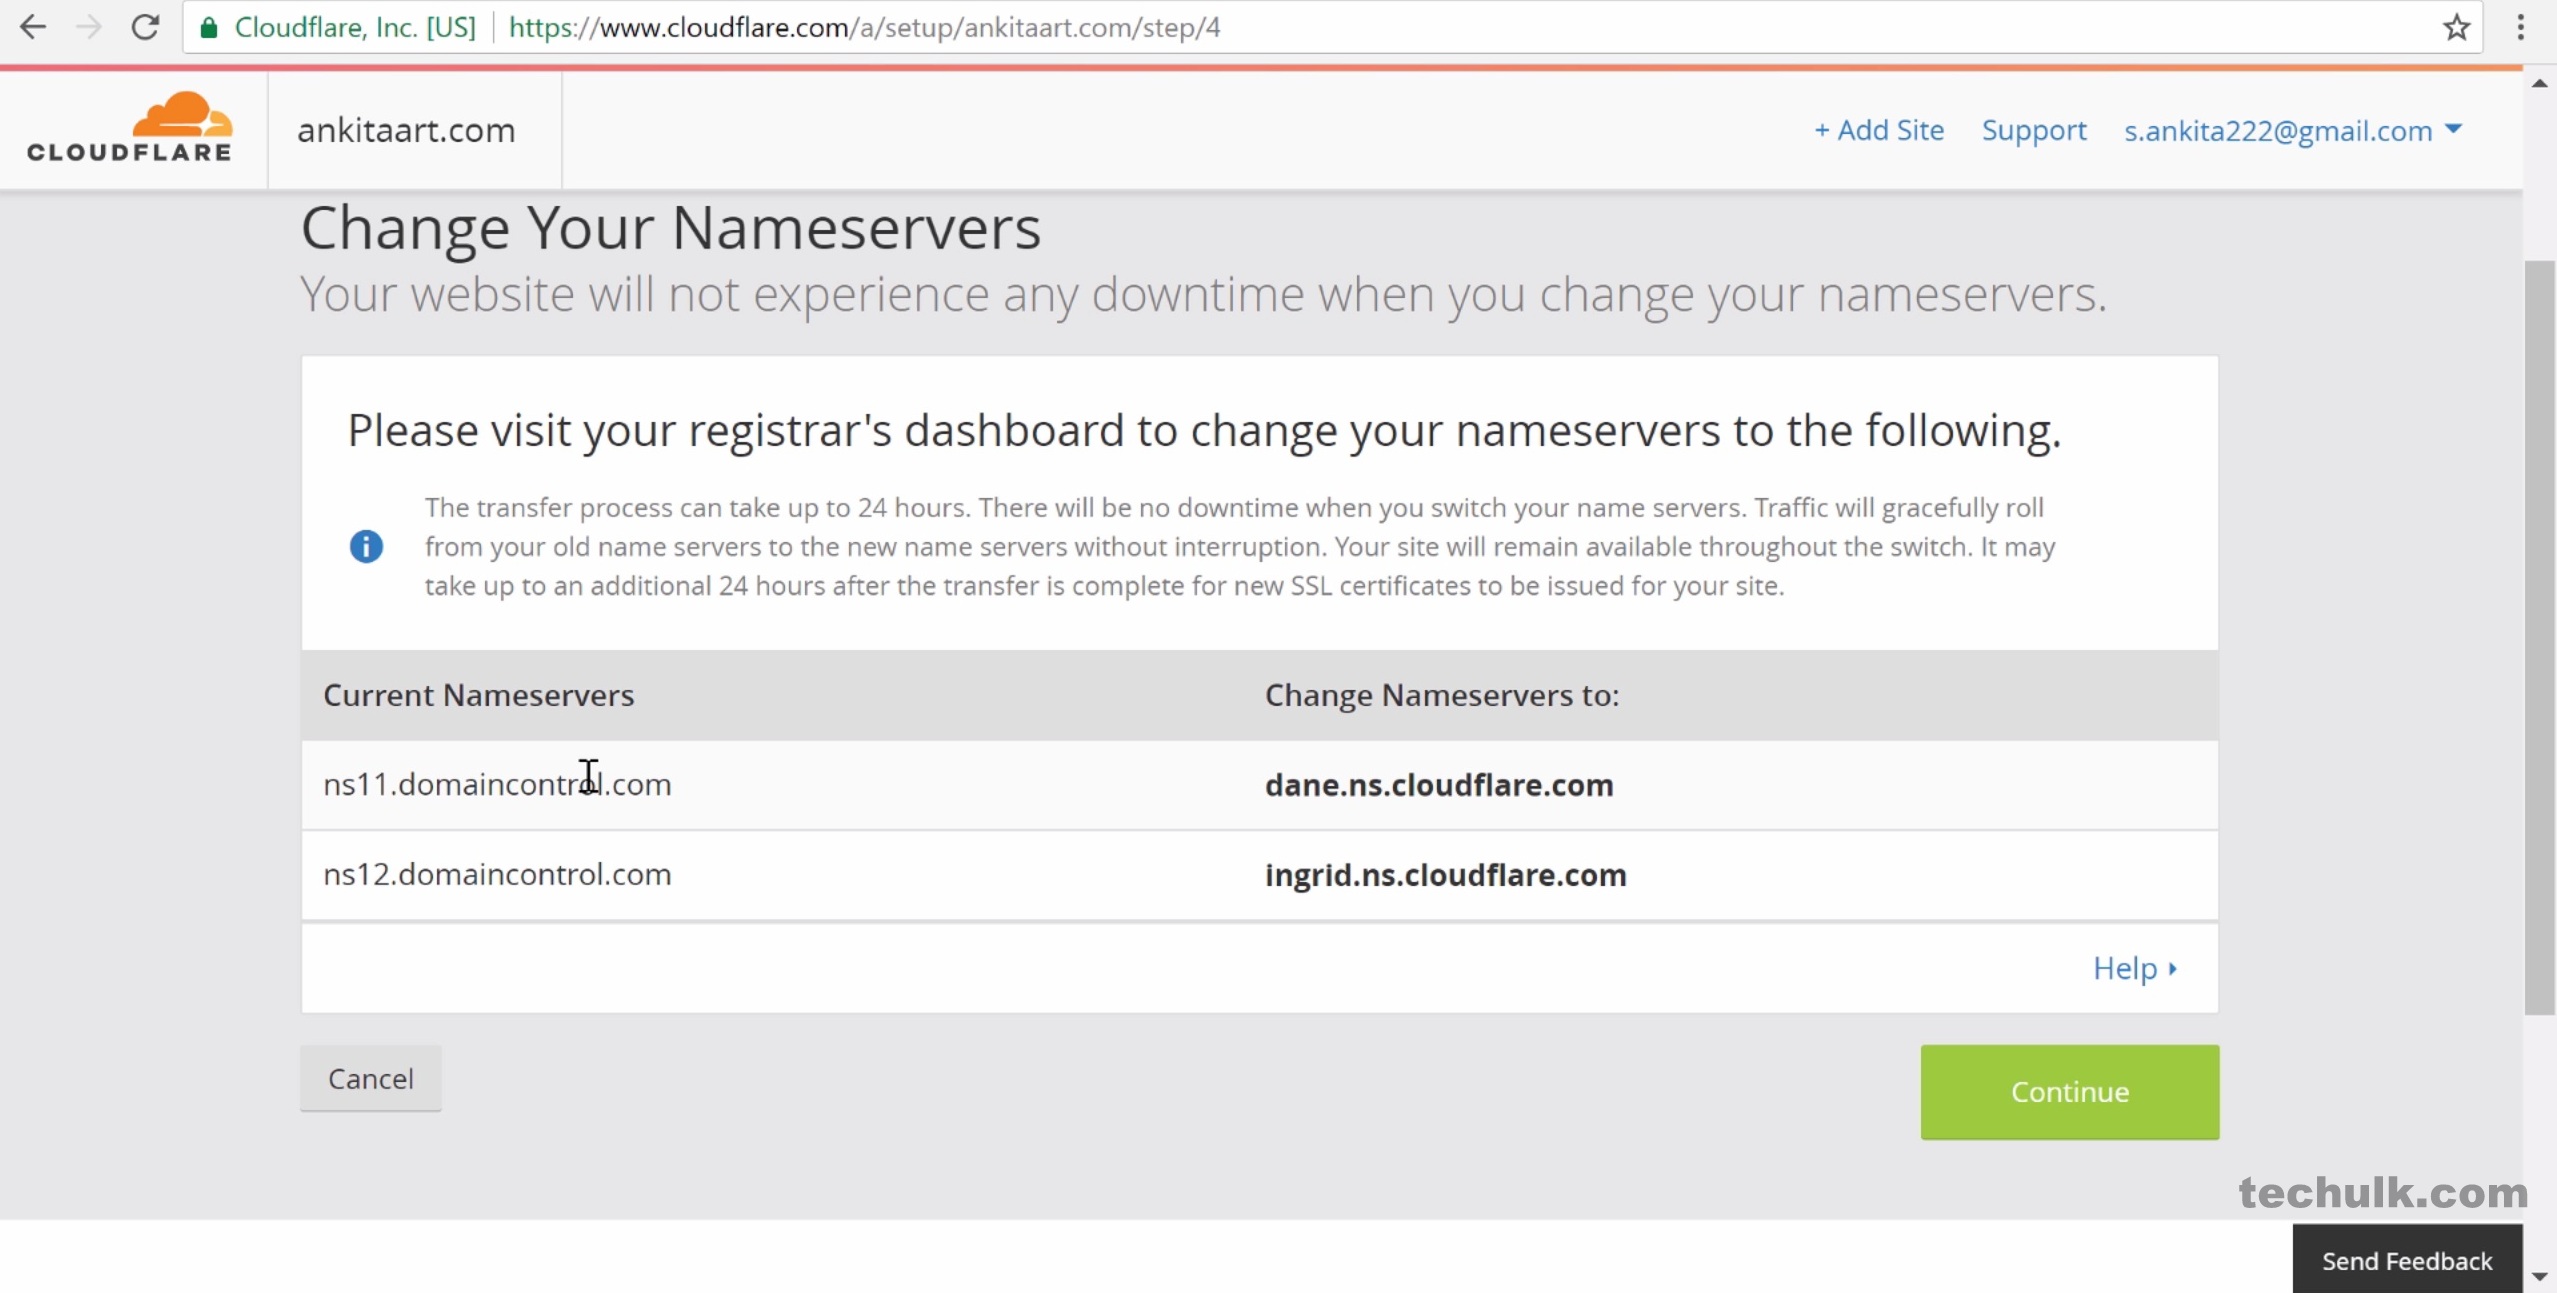

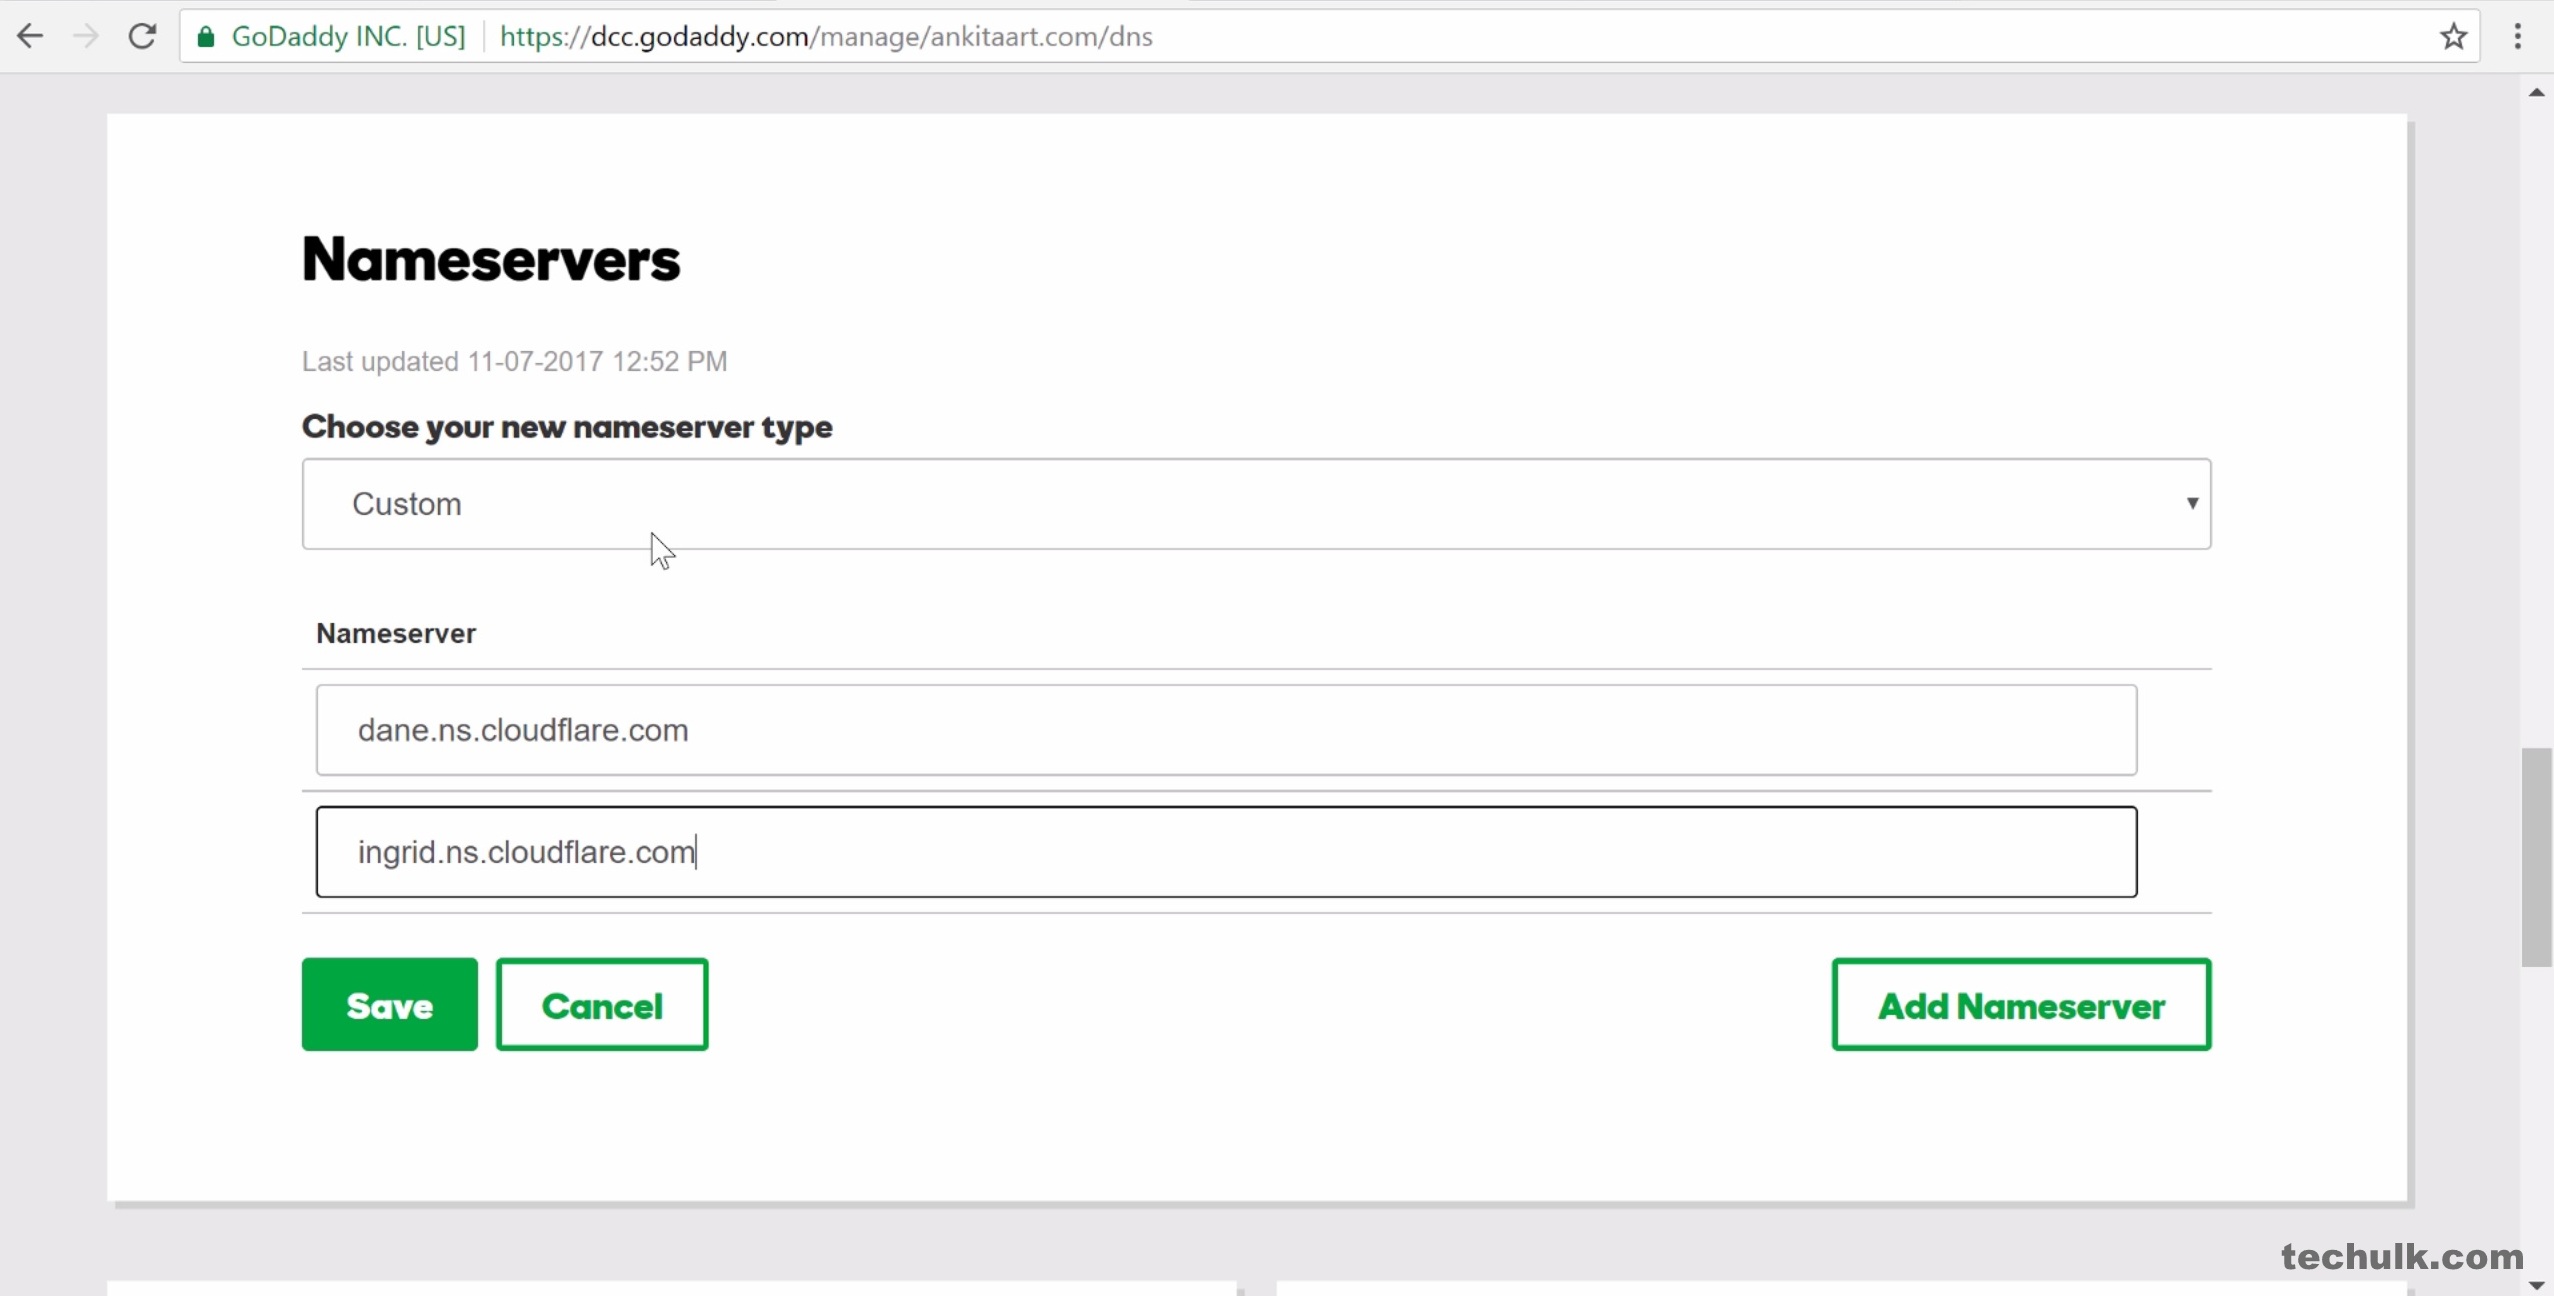
Step 4: Now the most crucial part of the setup arises which is “changing the Namesevers”. It will show your current Nameservers (on the left) and the new Nameservers (on the right).
Step 5: Now login to your domain registrar dashboard (from where you have purchased your domain). Then head over to My Domains>>Manage DNS option. Then scroll down to add a custom Nameserver. Here copy the new Address (from Step 4) in each line and replace both of your old NS with the new one. Finally hit save.
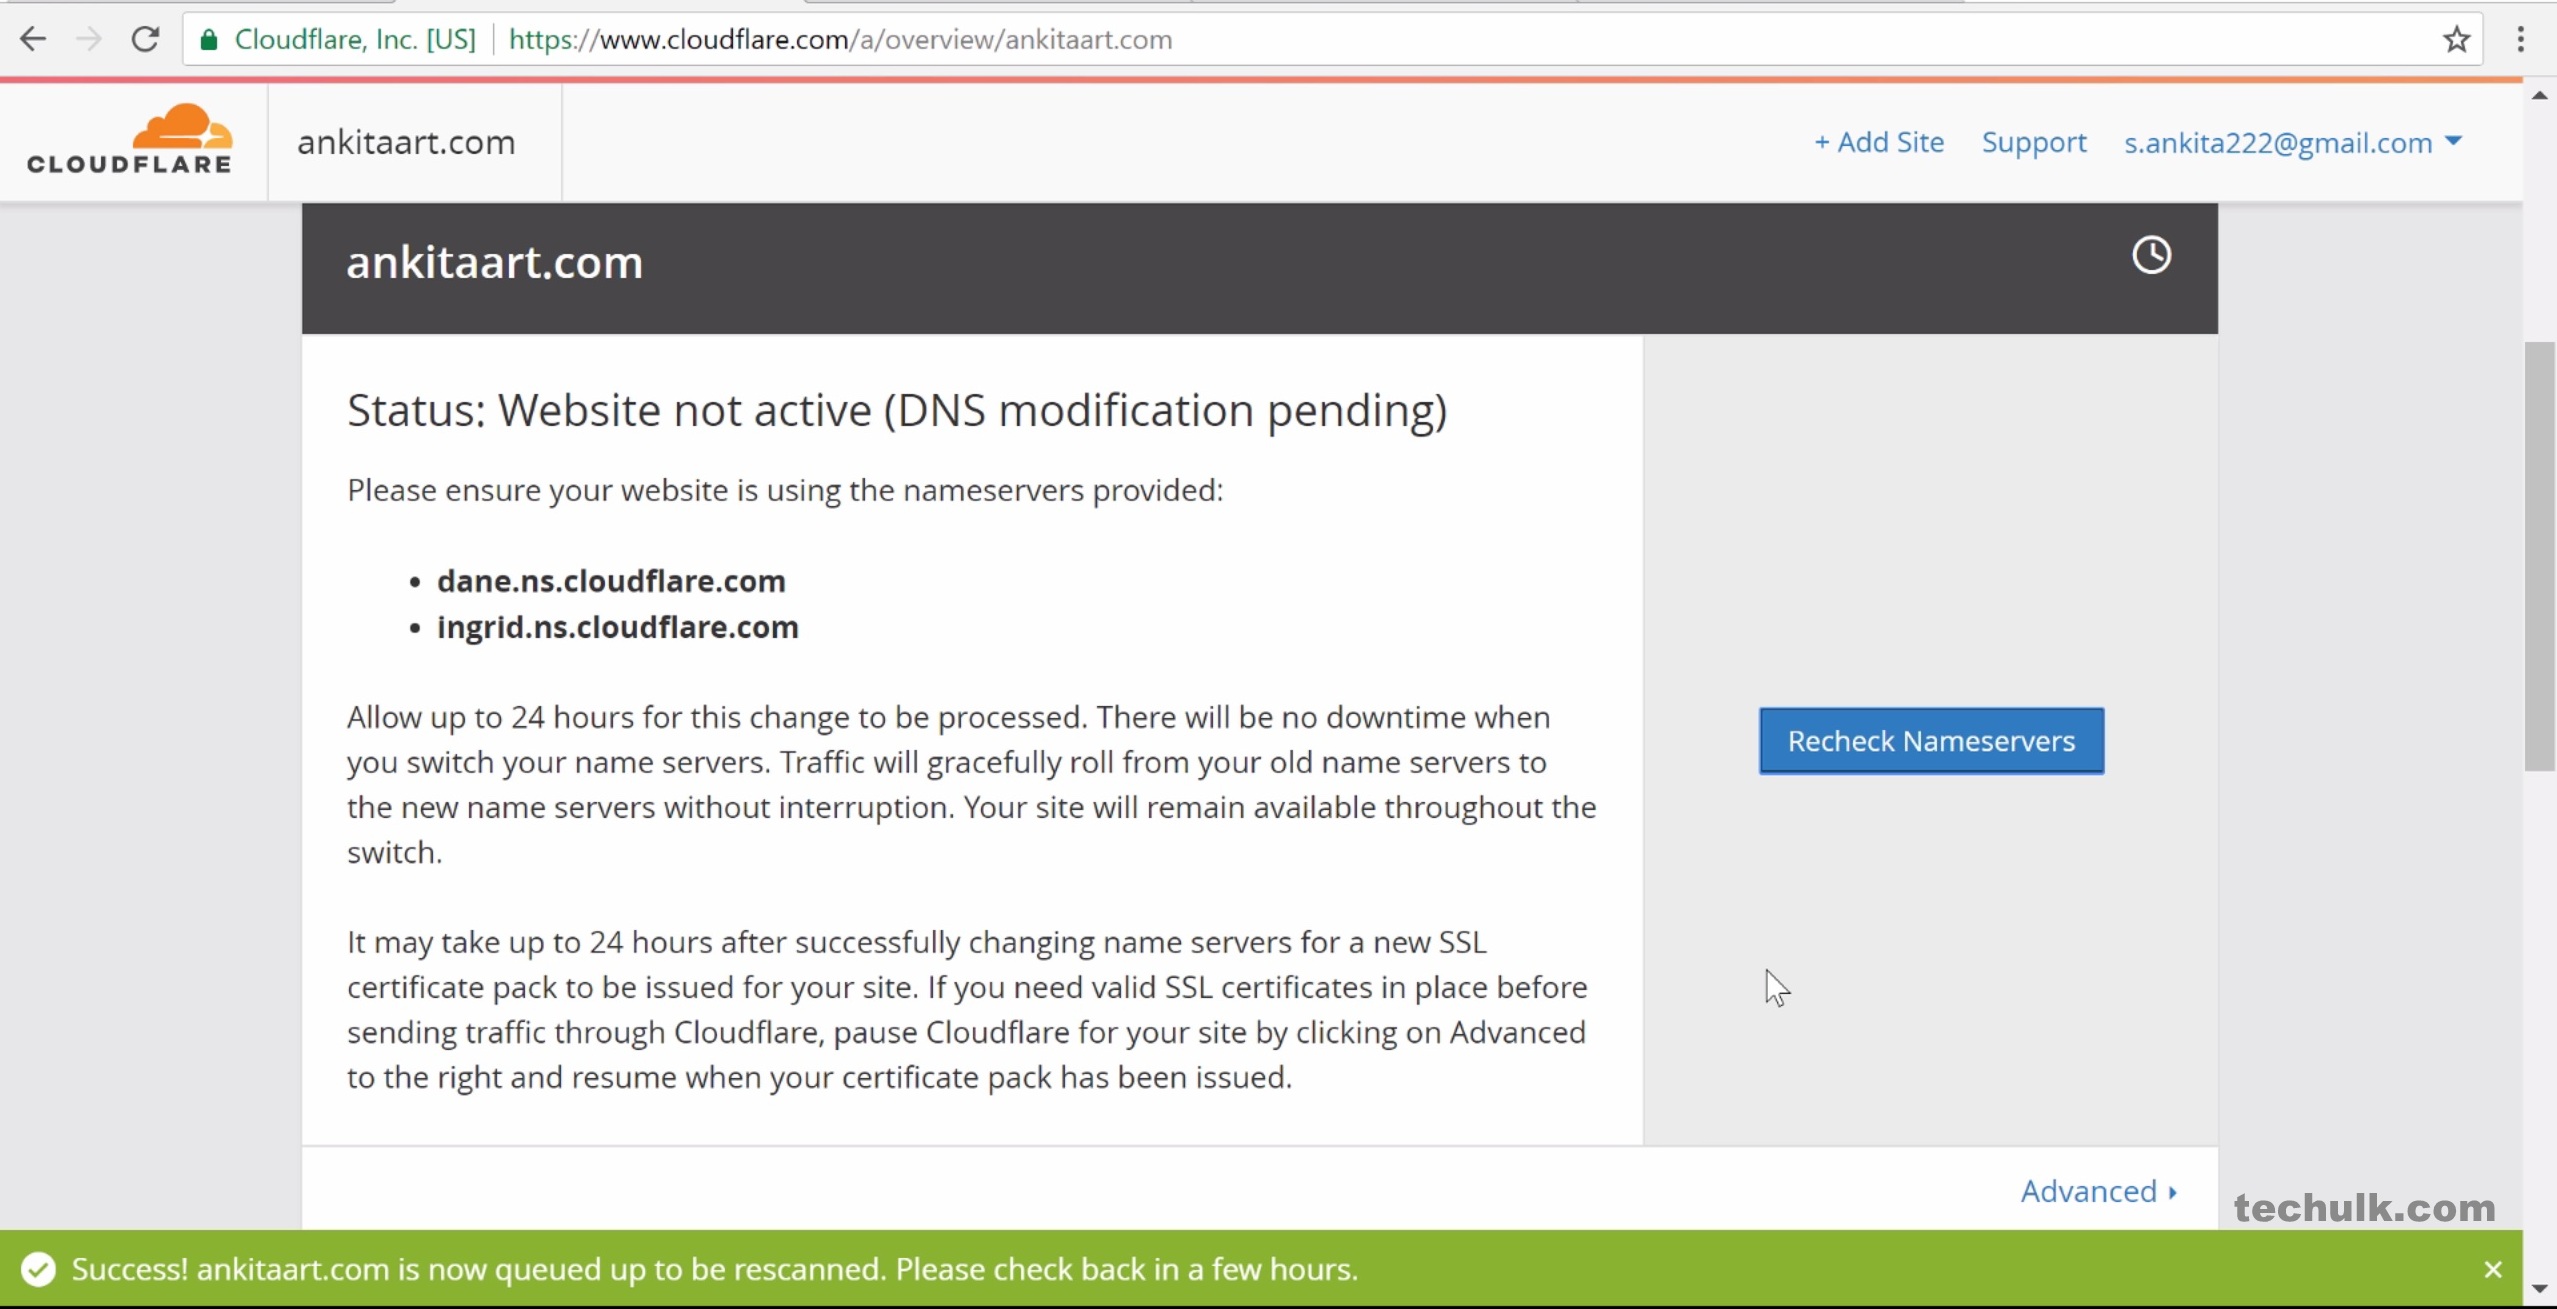
Step 6: Now head to your CloudFlare’s account tab and click “Recheck Namesevers” option (in blue). A green Success bar will appear at the bottom.
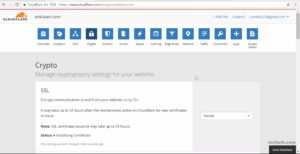
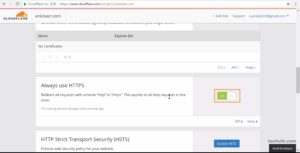
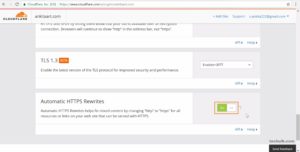
Step 7: Select the “Crypto” tab from the top. Then choose the “Flexible SSL” option from the dropdown list. Keep scrolling down and you will find “Always Use HTTPS” and “Automatic HTTPS Rewrites” options. Turn both of them on. It will redirect the traffic coming from HTTP to HTTPS and will fix the mix content issue.
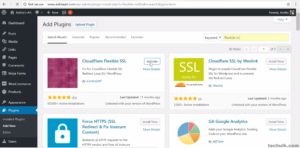
Step 8: Now login to your WordPress dashboard and go to “Add a Plugin” page. Then search for a plugin named “Flexible SSL” by iControlWP and install it. Soon after the plugin gets installed quickly “activate” the plugin.
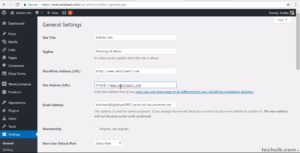
Step 9: Goto your WordPress settings and change the Site Address (URL) of your website from http to https and save it.
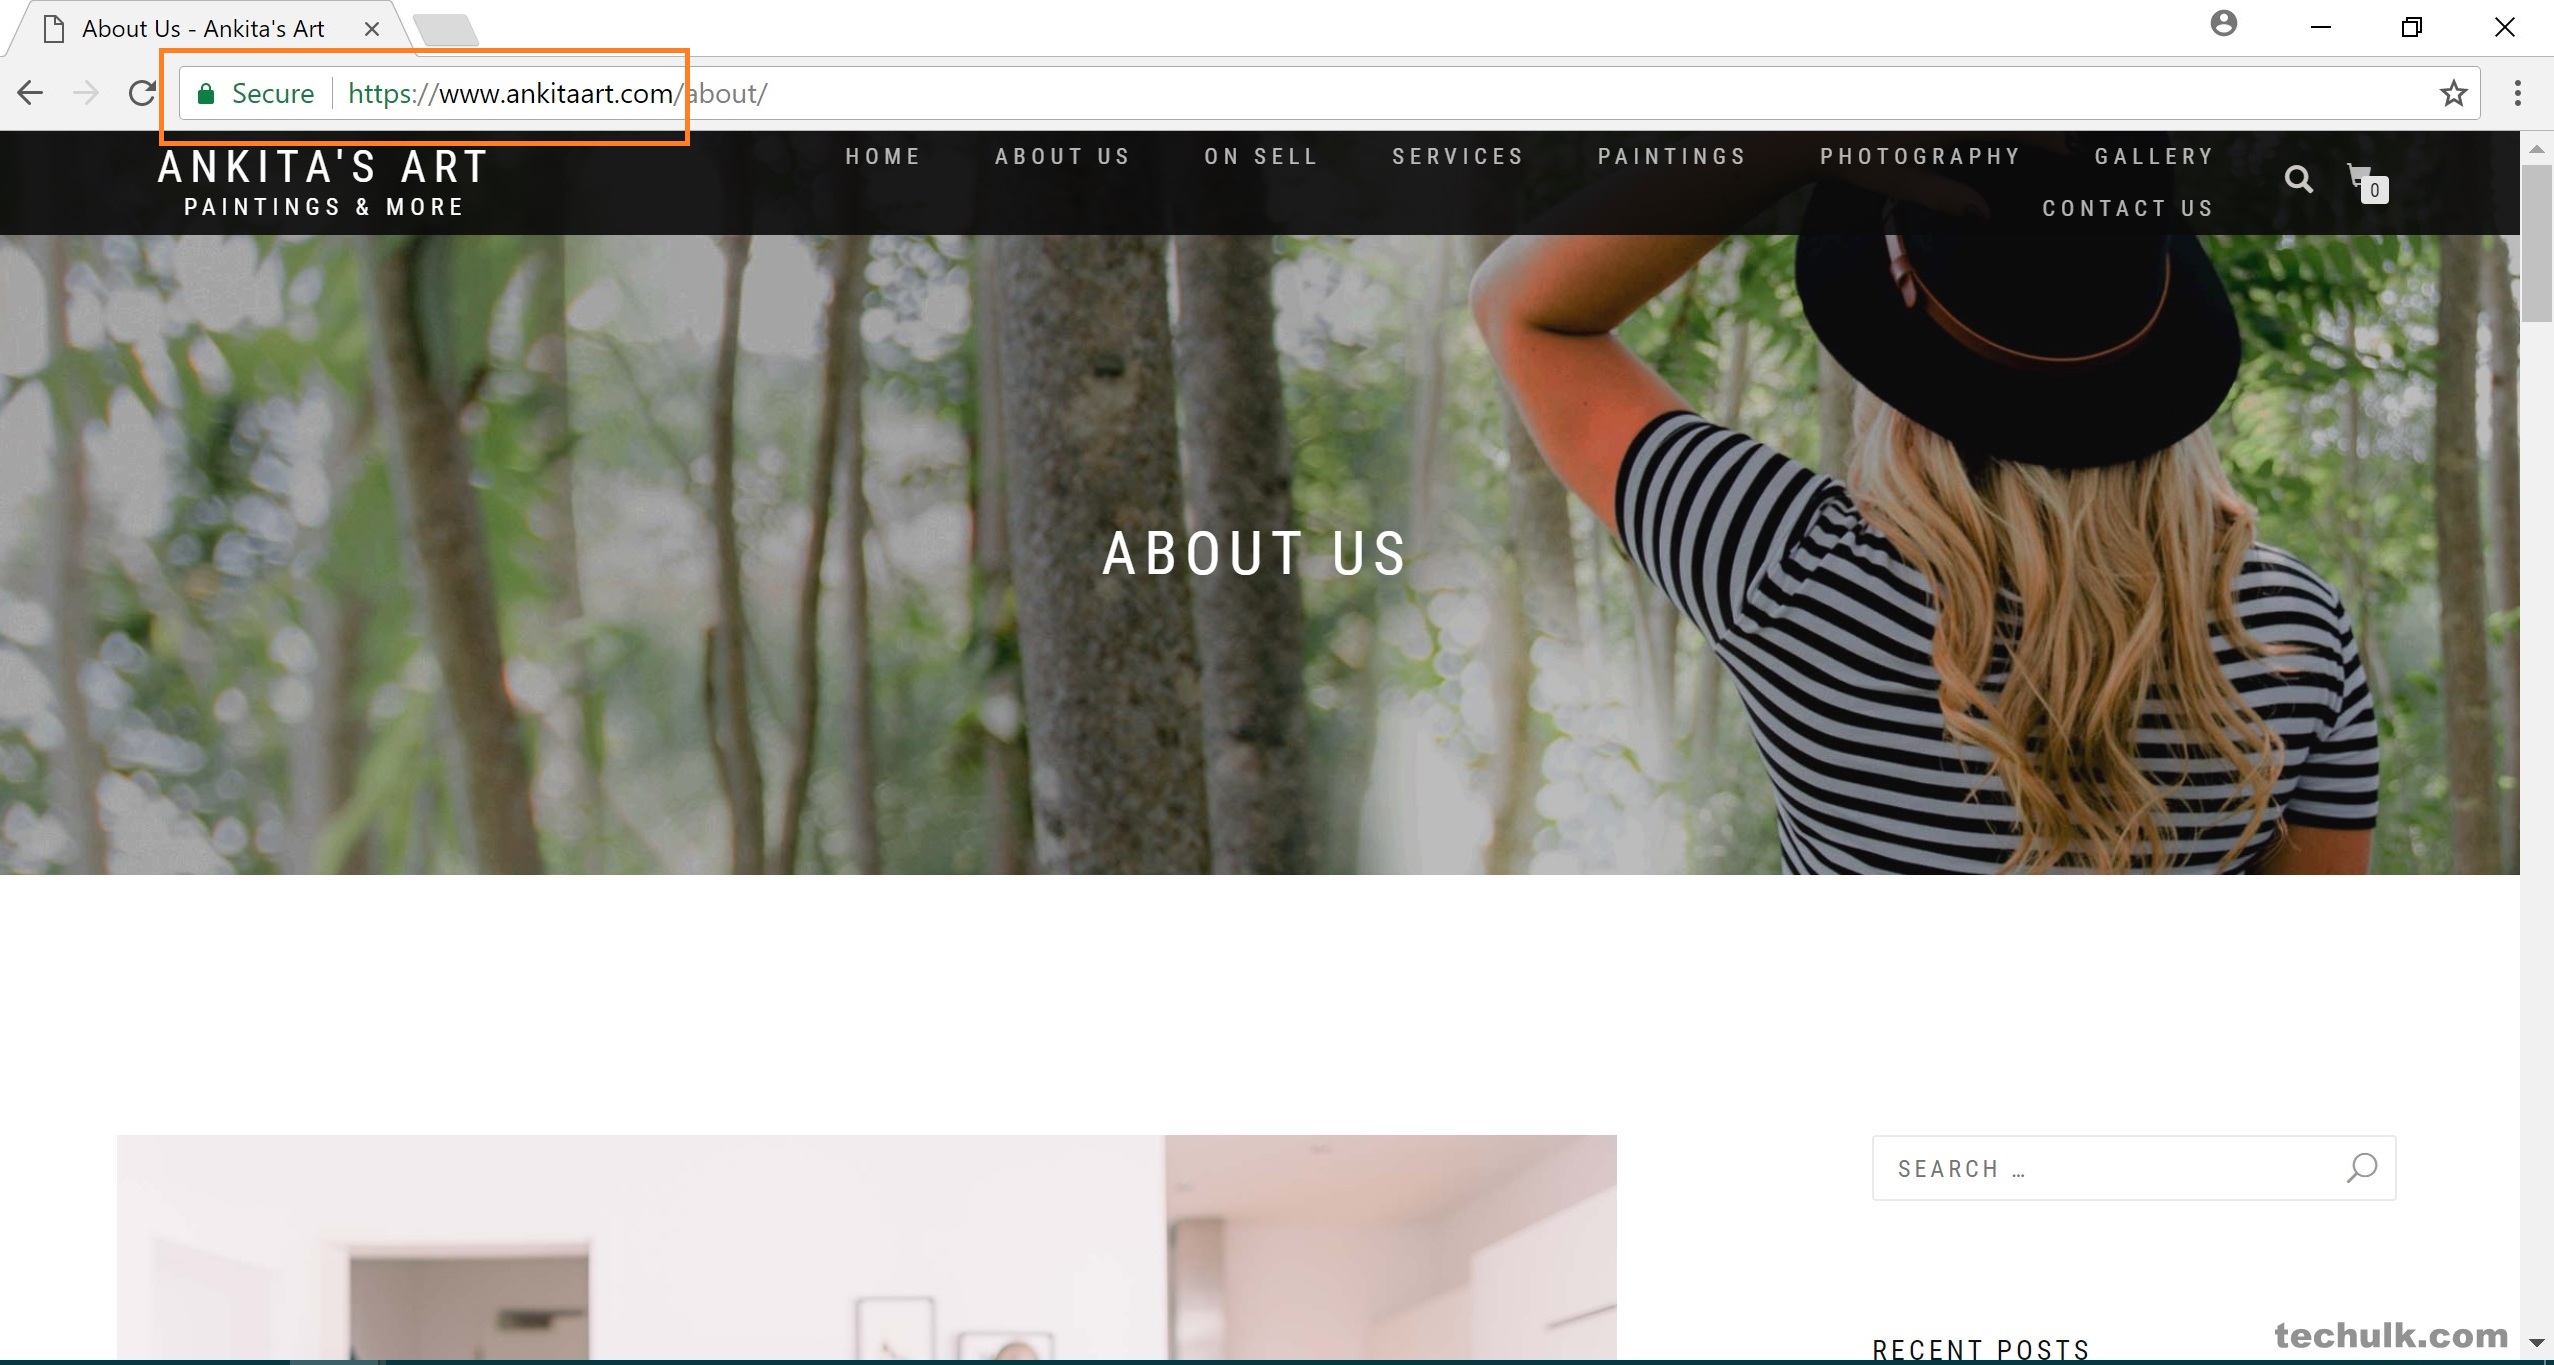
Step 10: Now hit the “View Site” option to check if everything went as needed. Or open a new tab and simply type your domain. If everything worked as required then it will show a green padlock sign near your site’s address bar. If not then wait for couple of hours so that everything gets fixed automatically.
Note: I personally use different hosting and domain service for my site and it took more time (5 hours to settle down). Compared to the website having single hosting and domain service. Hostgator and Big Rock took more time compared the GoDaddy. It may vary with various hosting providers.
Here is a complete walk-through for adding a free SSL on your website:
Have any queries regarding the topic? Feel free to comment it down below or submit your thoughts at our Contact Us Form. Happy Safe and Secure Surfing.
5 Comments
there is no plugin right now which one i use
Dear Shivam, you can install “Cloudflare Flexible SSL” by One Dollar Plugin.
Can I add ssl on blogger hosted domain
Blogger platform offers a free SSL with every account.
Now Blogger is also providing free ssl for all custom domains