Close Menu
    Facebook X (Twitter) Instagram
    • Privacy Policy
    • Facebook Page
    • Channel
    • Twitter
    • Sitemap
    Facebook X (Twitter) Instagram
    TechulkTechulk
    • Menu
      • Blogging
      • Android
      • Apps
      • Rooting/Flashing
      • Games
    • How-To
    • Troubleshooting
    • Reviews
    • News
      • Latest
      • Trending
      • Around The Web
    • Affiliate Disclosure
    TechulkTechulk
    Home»Blogging»How To Add About Me On Blogger
    Blogging

    How To Add About Me On Blogger

    Shravan DasBy Shravan DasMarch 15, 2015Updated:August 6, 20168 Comments2 Mins Read
    Facebook Twitter Pinterest LinkedIn Tumblr WhatsApp Email
    Share
    Facebook Twitter LinkedIn WhatsApp Pinterest Email
    Adding an ‘About Me’ or ‘About Us’ section on your blog gives a very nice and professional touch to the page. It gives a face to the whole blog and an opportunity to show everyone that who’s working behind the entire blog. By the following method you will be able to customize your own About section, adding your own custom image the way you like.
    Now, lets move on towards the simple steps :
    STEP 1: Login to your blogger account and click New Post.
    Add about me on the blog
     
    STEP 2: Now type everything related to yourself inside the blank post, that you want to shown up in the About section. You can add your own personal favorite image or your brand’s image in it with your description. Place the image anywhere according to your choice inside the post.
    STEP 3: When you are done, then switch the whole page to HTML mode.
    STEP 4: Copy all the codes from the page (Ctrl+a & Ctrl+c).
    Add about me on blogger
    STEP 5: Now save the post inside the drafts and move towards the Layout section.
    Add about us section on blogger
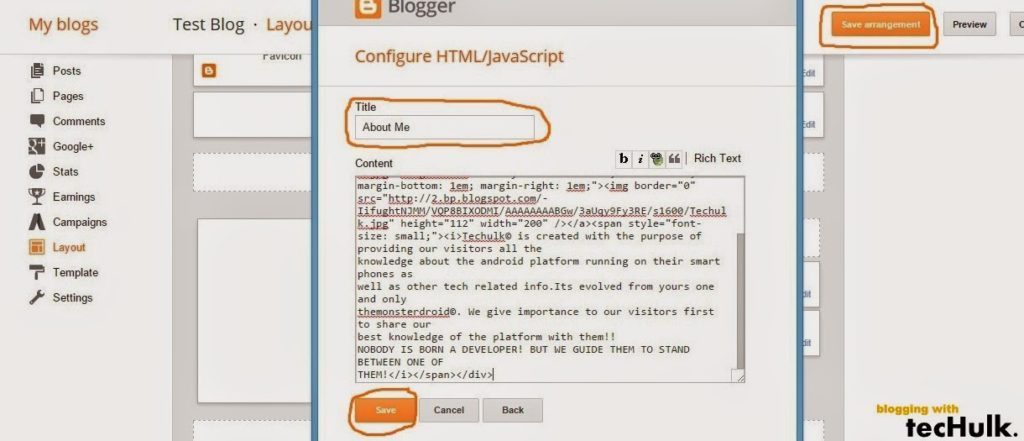
    STEP 6: Click the Add a Gadget and browse for the HTML/JavaScript and paste the copied codes inside the body (As shown in the image).
    STEP 7: Give the gadget a title like “About Author”, “About Me”, “About Us”, “Its Me Behind The Blog” etc.
    STEP 8: Now just click save and place the gadget wherever you want to be shown on your blog then select Save arrangement.
    You placed your About section successfully, see how it looks.
    that’s all for today if you made any mistakes or have some problems related to the post, just comment down below will help you out when I get time.
    blogger Google
    Share. Facebook Twitter Pinterest LinkedIn Tumblr WhatsApp Email
    Shravan Das
    • Website
    • Facebook
    • X (Twitter)
    • Instagram
    • LinkedIn

    A Tech Geek who loves to write about WordPress blogging, How-To's, and fixing errors. He founded techulk with the sole purpose of providing visitors the exact information they need with simple and step-by-step working explanations.

    Related Posts

    Canva Pro: Your Ultimate Online Design Tool (2024)

    December 10, 2024

    The Video Advantage: Elevate Your Blog Engagement to New Heights

    June 28, 2023

    A Beginner’s Guide to Understanding Roku and How It Works

    April 24, 2023

    Does Panda Express take Apple pay

    March 10, 2023

    Does Safeway take Apple Pay?

    March 1, 2023

    Does Wingstop Take Apple Pay

    February 21, 2023
    View 8 Comments

    8 Comments

    1. Seidu Hamza on September 2, 2021 1:07 am

      Thank you very much for your help

      Reply
      • Shravan Das on October 31, 2021 11:15 am

        Thanks for your comment!

        Reply
    2. Malati Shankar on June 2, 2019 11:45 am

      Sir, Very informative and useful post. Just one doubt what is the meaning of ”Place the gadget wherever you want to be shown on your blog”. Thanks for the post. With regards.

      Reply
      • Shravan Das on June 4, 2019 2:35 pm

        Hi 🙂 , you can place the gadget on your blog’s page wherever you like to. It will display the custom “About me” there. Under the layout section, the “About Me” gadget can be dragged and replaced.

        Reply
    3. Rishabh Kumar on January 20, 2019 8:47 am

      Thankyou very much sir…

      Reply
      • Shravan Das on January 25, 2019 4:24 pm

        You’re welcome! 🙂

        Reply
    4. Jezreel on July 1, 2018 9:51 am

      Thanks

      Reply
    5. kakali debnath on September 5, 2017 12:32 am

      Thank you very much! It is a different method that I learn today, Before I used to create ‘About page’ through Blogger page creation. So, I want to know what is the difference between this method and blogger page creation method?

      Reply
    Leave A Reply Cancel Reply

    This site uses Akismet to reduce spam. Learn how your comment data is processed.

    – Ads –
    Recent Comments
    • Shravan Das on What is CAMRIP, DVDRIP, HDTS, HDTV & other releases?
    • Gumby on What is CAMRIP, DVDRIP, HDTS, HDTV & other releases?
    • ajay kumar on Kerala vision broadband Review & Plans
    • Ravindran on Change Jio fiber login password | Easy Guide 2020
    – Ads –
    Facebook X (Twitter) YouTube Instagram
    • Privacy Policy
    • Facebook Page
    • Channel
    • Twitter
    • Sitemap
    © 2025 Techulk

    Type above and press Enter to search. Press Esc to cancel.