")
The smartphone industry is dominated by the Android OS which is an open-source project. The reason for its success is that it is open source and allows customization to a great extent. The usual stock android is a simple OS with minimum features. A developer is interested in building and testing a new ROM and using the latest update of the android version. The smartphone companies do not provide regular updates for some devices which leads to the only solution: Flashing a Custom ROM. This requires a custom CWM or TWRP recovery. While flashing a particular custom ROM, many users have encountered a “(STATUS 7 Error) installation aborted” scenario. Today we will be providing you with a detailed explanation and how-to-fix for the problem.
Contents
What is a Status 7 error?
The status 7 error is an exception thrown when the ROM’s updater script file called “asserts” checks for the model of the device on the custom ROM you are trying to install. The asserts file acts as a safety mechanism so that the wrong ROM is not installed on your device.
- Now, this error might show up when you are flashing a custom ROM of another device. But if not then it’s an error made by the developer in the updater script of the custom ROM.
- This can simply be fixed by flashing a TWRP recovery but then you will not be able to restore any backups made with the CWM recovery.
- Also, an update to the latest CWM recovery using the ROM manager usually does the trick.
But what if you have the latest CWM recovery and the correct ROM to flash on your device and still the problem pertains?
Well then here we are to help you fix this issue.
Solution 1: How to fix error 7 twrp without PC
Sometimes it is easy to bypass the twrp error 7, without the need of using a PC. However, these mentioned steps have to be followed carefully:
Step 1: Check whether you have the right version of TWRP installed on your device. (Check your respective phone’s ROM thread on xda and see the comments if anyone is facing a similar issue )
Step 2: Soon you encounter the error 7 in twrp, tap back and navigate to Wipe and simply perform “Factory Reset option”. Then try to flash the ROM again.
Step 3: If it doesn’t fix the issue then, repeat Step 2, however this time after factory resetting the device do not flash the ROM! Reboot the device into recovery instead. To reboot into recovery Goto Reboot>Recovery! and then try to flash the ROM again.
If following the above steps doesn’t solve the twrp error 7, then you need the fix the error with the help of PC, as mentioned down.
Solution 2: How to fix twrp error 7 with PC
Step 1: Download the custom ROM for your device on your PC and extract it using 7-Zip.
Step 2: Open the extracted folder and browse to the following directory:- META-INF/com/google/android. It contains two files namely update-binary and updater-script.

Step 3: Rename updater-script to updater-script.txt and open it with Notepad++/Sublime Text or any other text editor you might find.
Step 4: Find the line starting with “assert”. Usually, this is the first line of one of the starting lines of code. Select every line starting from there to the first semicolon you find.
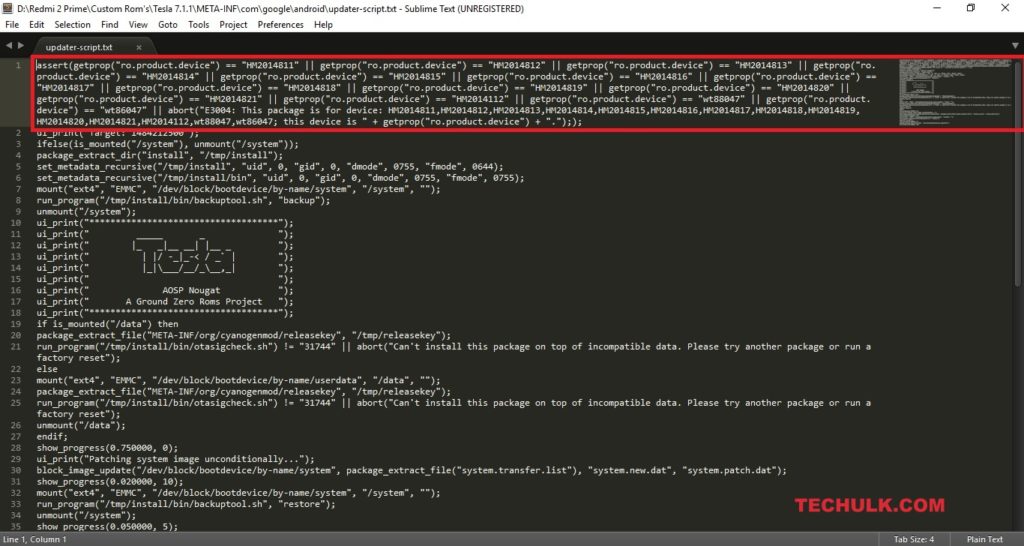
Step 5: Remove the selected line and save the file as updater-script with the file type – All files(*.*).
Step 6: Zip the file together and try re-installing the ROM on your device. This time the installation will proceed without any issue.
Solution 3: How to fix twrp error 7 with using pc
Step 1: Follow Step 1-3 from METHOD 1.
Step 2 : Find the line assert(getprop(“ro.product.device”) == “HM2014811“ and change the highlighted area with your device name. If the ROM you are flashing is compatible with other devices then you might find the same line a number of times separated by || with the name of those compatible devices.
Step 3: Save the file after editing as updater-script with the file type – All files(*.*).
Step 4: Zip the file together and try re-installing the ROM on your device. This time the installation will proceed without any issue.
That’s all for now guys. Feel free to comment if you are still facing issues.
Let us know, in the comment section if you have fixed the issue. Comments are really helpful for others as well. Thanks, keep visiting for more tech tips.
4 Comments
is the status 7 errror the same as signature verififcation error
Invalid Zip file format!
Error installing zip file ‘filename.zip’
Updating partition details…
…done
This kept happening after i followed method 1 and edited details
I checked the format as well
Please Help!
Galaxy pocket neo gets stuck on installing software update and just say error and restart again and again.What should I do?
Go-to your recovery by pressing (Volume Up + Home + Power button) and do a factory reset and reboot again.
If it doesn’t help then Flashing your stock ROM using ODIN is the only option left!!
Thanks,